How Many Cap Nails for House Wrap
There is no definitive answer to this question as it depends on a number of factors, including the size and type of house wrap being used, the climate and weather conditions, and the preferences of the installer. Generally speaking, however, most installers use between 1-2 nails per square foot when installing house wrap.
If you’re looking to install house wrap on your home, you’ll need to know how many cap nails you’ll need. A standard roll of house wrap is about 200 square feet, so you’ll need approximately 1,000 cap nails. However, it’s always best to have a few extra on hand, just in case.
When installing house wrap, be sure to start at the bottom and work your way up. This will ensure that the Wrap is properly secured and won’t blow away in strong winds.
Do You Tape the Bottom of House Wrap
If you’re building a new home or renovating the exterior of an existing one, you may be wondering if you need to tape the bottom of house wrap. House wrap is a type of breathable membrane that helps protect your home from water damage and air infiltration. While it’s not required by code in most areas, taping the bottom of house wrap can help create a more airtight seal and provide an extra layer of protection against moisture and wind damage.
How to Attach House Wrap
If you’re like most people, the thought of attaching house wrap probably doesn’t fill you with a sense of excitement. In fact, it might even make you a little anxious. After all, this is an important step in the home building process and if done incorrectly, it could have serious consequences.
But don’t worry, we’re here to help. In this blog post, we’ll walk you through the entire process of attaching house wrap, step-by-step. We’ll also provide some helpful tips and tricks that will make the job easier and ensure that your home is properly protected from the elements.
So let’s get started…
The first thing you need to do is gather all of the materials you’ll need for the job. This includes things like house wrap, tape measure, utility knife, caulk gun, and staples or nails (if using).
Once you have everything gathered together, take a few minutes to read over the manufacturer’s instructions. This will ensure that you understand how to properly install the product.
Next, use your tape measure to determine how much house wrap you’ll need to cover your home.
Once you have that number, cut the material to size using your utility knife. Be sure to leave enough extra material around the edges so that it can be properly secured later on.
Now it’s time to start attaching the house wrap!
Begin at one corner of your home and unroll the material as you go along. Use either staples or nails (whichever is specified in the manufacturer’s instructions) to secure the house wrap in place every few feet or so. As you work your way around corners and edges, be sure to trim away any excess material so that it lays flat against your home’s surface.
How to Install House Wrap on a Shed
When it comes to installing house wrap on a shed, there are a few things you need to keep in mind. First, you need to make sure that the surface is clean and free of debris. Next, you’ll want to measure the area you’re working with so you know how much material you’ll need.
Once you have those two things taken care of, you’re ready to start installing your house wrap!
The first step is to unroll the house wrap and cut it to size. Make sure that you leave enough excess material around the edges so that you can properly secure it later on.
Once the piece is cut, apply a generous amount of adhesive to one side and then attach it to the shed. Start at the bottom and work your way up, making sure that each successive piece overlaps the one below it by about six inches.
Once all of the pieces are in place, use a utility knife or scissors to trim off any excess material.
Finally, use tape or staples along all of the seams and edges to ensure a tight seal. That’s all there is to it! Installing house wrap may seem like a daunting task but if you take your time and follow these simple instructions,you’ll be done in no time!
Taping House Wrap around Windows
Installing house wrap around windows is a quick and easy way to improve your home’s energy efficiency. House wrap is a type of breathable, water-resistant material that helps keep moisture out of your home while still allowing it to “breath.” This prevents mold and mildew from growing inside your walls and keeps your home more comfortable year-round.
Taping the seams of your house wrap is an important part of the installation process. Sealing the seams with tape creates a barrier that further prevents moisture from entering your home. There are a few different types of tape that can be used for this purpose, but we recommend using an acrylic-based tape specifically designed for sealing house wrap seams.
Applying tape to the seams of your house wrap is a simple process: start by cutting the tape to size (it should be slightly longer than the seam itself), then peel off the backing and apply the tape to the seam, pressing it firmly into place. Once all of the seams are sealed, you can trim off any excess tape with a utility knife.
That’s it!
By taking just a few minutes to install house wrap around your windows, you can help improve your home’s energy efficiency and prevent unwanted moisture buildup.
How Many Layers of House Wrap Do I Need
Most builders use house wrap as a water-resistant barrier behind the siding. House wrap is perforated to allow moisture vapor to escape from the wall cavity, but it won’t let liquid water in. That’s important because even though fiberboard and foam sheathing are also permeable, they’re not as permeable as air.
So if you have a lot of wind-driven rain or snow, the house wrap will help keep the wall dry.
There are different thicknesses of house wrap available, but most builders use 9-foot wide rolls that are either 3/8 inch or 1/2 inch thick. The 3/8 inch thick house wrap weighs about 2 pounds per 100 square feet and the 1/2 inch thick house wrap weighs about 3 pounds per 100 square feet.
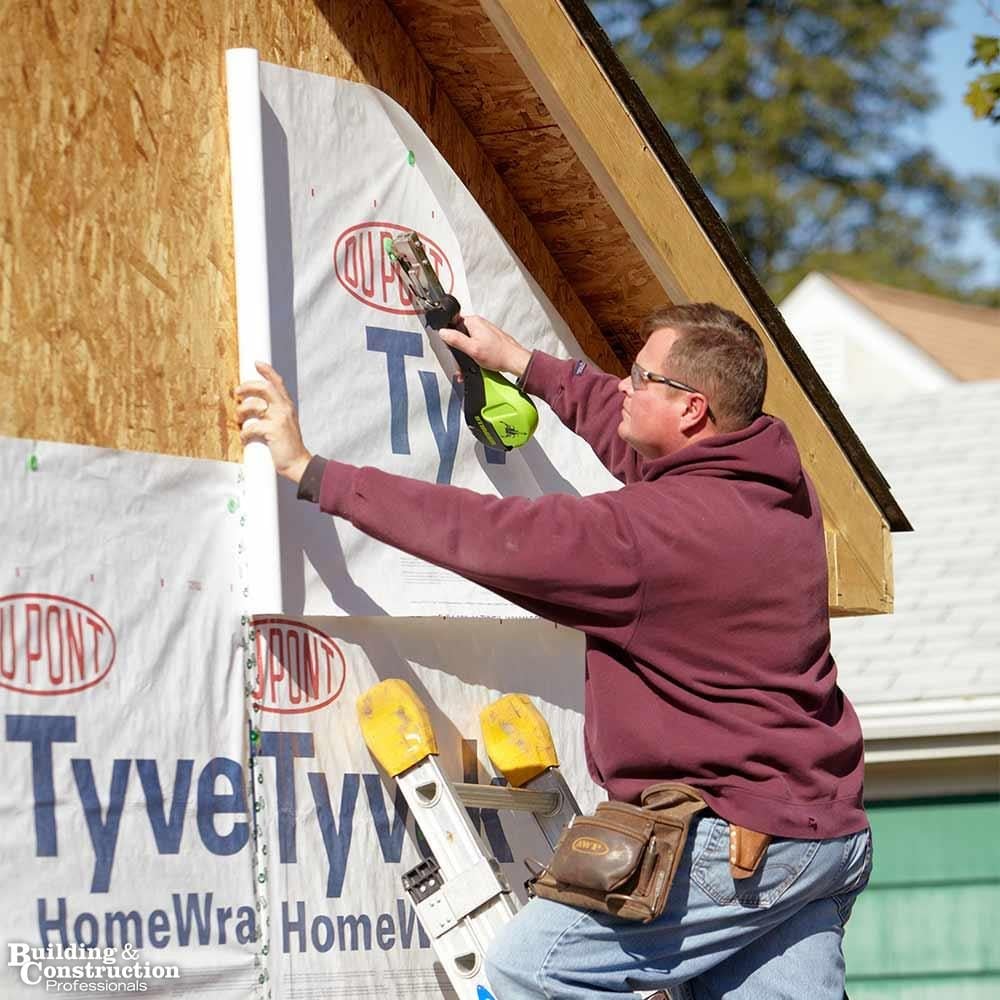
Credit: www.familyhandyman.com
Do You Need Cap Staples for House Wrap?
If you are installing house wrap, you will need cap staples to keep it in place. Cap staples have a wide, flat head that helps to grip the material and prevent it from slipping or blowing away. They also have a sharp point that penetrates easily into wood or other materials.
What is the Nailing Pattern for House Wrap?
If you’re working on a home construction project, you may be wondering what the nailing pattern is for house wrap. House wrap is a material that’s installed over the sheathing of a house to protect it from weather damage. The nailing pattern for house wrap varies depending on the type of siding that will be installed over it.
For instance, if you’re planning to install vinyl siding, you’ll need to use a different nailing pattern than if you were installing wood siding. With vinyl siding, nails should be placed every 16 inches on center along the bottom edge of the vinyl panels. They should also be placed every 12 inches on center at all vertical seams.
As for wood siding, nails should be placed every 8 inches on center along all horizontal seams. At vertical seams, they should be placed every 12 inches on center.
It’s important to follow the manufacturer’s instructions when installing house wrap.
This will ensure that your home is properly protected against moisture and wind damage.
How Long Should House Wrap Nails Be?
If you’re installing house wrap, it’s important to use the right kind of nails. House wrap nails should be long enough to penetrate through the sheathing and into the studs beneath. They should also be galvanized or stainless steel to resist rusting.
As for how long the nails should be, that will depend on the thickness of your sheathing. If you’re using 1/2-inch plywood, for example, you’ll need 3-inch nails. But if you’re using 5/8-inch plywood, you’ll need 4-inch nails.
In either case, it’s a good idea to err on the side of longer nails rather than shorter ones. That way, you can be sure they’ll penetrate fully into the studs and provide a secure hold for your house wrap.
What is the Best Way to Fasten House Wrap?
There are a few ways to fasten house wrap, but the best way is to use staples. You want to make sure that the staples are long enough to go through the house wrap and into the sheathing underneath. You also want to make sure that you space the staples out evenly so that they will hold the house wrap in place.
Tyvek vs Nail Penetrations
Conclusion
The number of cap nails you’ll need for house wrap depends on the size of the project. If you’re working on a small project, you’ll probably only need a few hundred nails. However, if you’re working on a large project, you may need several thousand nails.
In either case, it’s always a good idea to have more nails than you think you’ll need, just in case.