How to Build a Floor to Ceiling Kitchen Cabinet
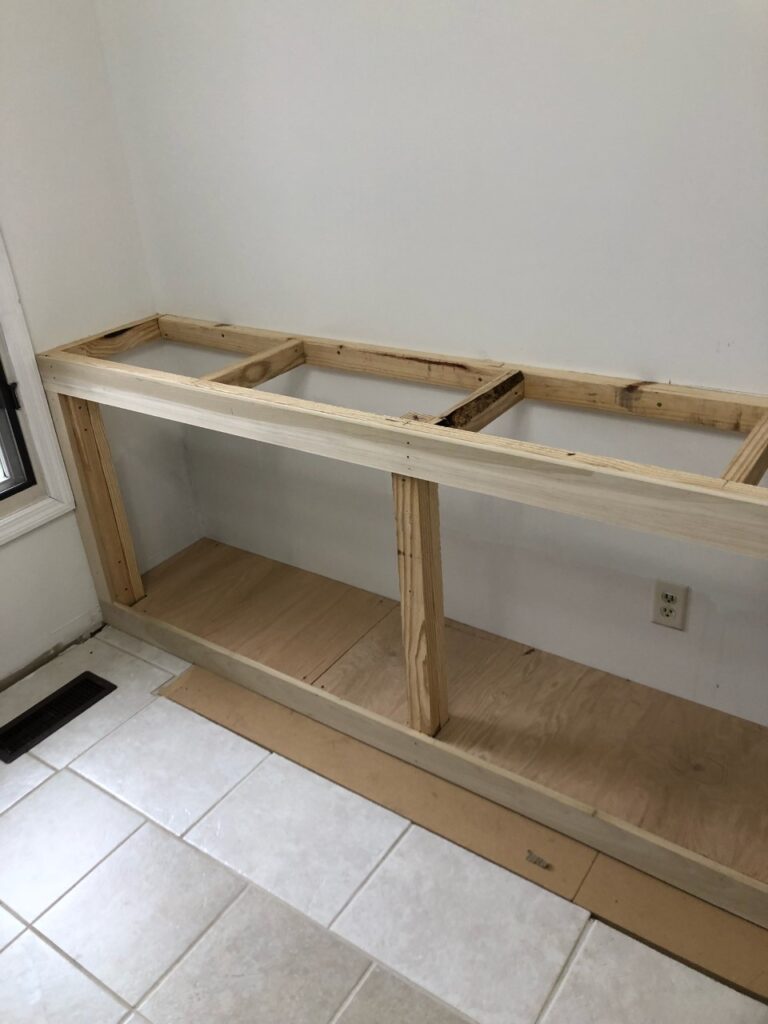
Building a floor to ceiling kitchen cabinet is a simple process that can be completed in just a few hours. The first step is to cut the lumber to size. Next, nail or screw the boards together.
Finally, add any desired trim or molding. This type of cabinet is perfect for storing large pots and pans, as well as providing extra counter space.
- Decide on the dimensions of your cabinet
- Cut the lumber for the frame of the cabinet and assemble it using nails or screws
- Install any shelves, drawers, or other features that you want inside the cabinet frame
- Cut and install your door panels to the front of the cabinet frame
- Hang your assembled cabinet on the wall using screws or brackets attached to studs in the wall
Ikea Floor to Ceiling Cabinets
If you’re looking for a stylish and affordable storage solution, Ikea floor to ceiling cabinets are a great option. These cabinets are perfect for small spaces, as they make use of otherwise wasted vertical space. They come in a variety of styles and colors, so you can find the perfect look for your home.
Ikea floor to ceiling cabinets are easy to install and come with all the necessary hardware. They’re also very sturdy, so you can be confident that your belongings will be safe and sound. If you need more storage than what these cabinets offer, you can always add additional shelves or baskets.
Whether you’re looking for a place to store towels in your bathroom or dishes in your kitchen, Ikea floor to ceiling cabinets are a great option. With their many benefits and attractive price tag, it’s no wonder they’re so popular!
Floor to Ceiling Kitchen Cabinets B&Q
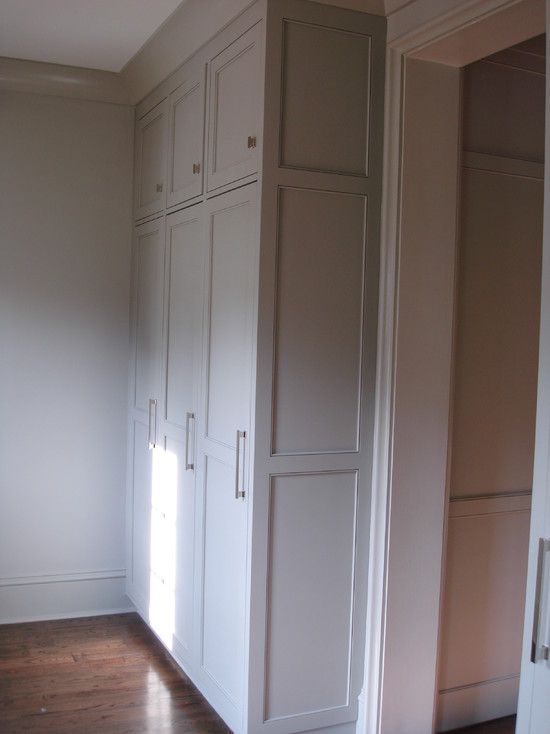
When it comes to kitchen cabinets, there are a lot of options out there. But if you’re looking for something that really makes a statement, floor to ceiling kitchen cabinets are the way to go.
Floor to ceiling kitchen cabinets make a bold design statement and can really transform the look of your kitchen.
They also provide extra storage space, which is always a bonus. If you’re considering this type of cabinetry for your own kitchen, here’s what you need to know.
Pros:
– Makes a big impact: Floor to ceiling kitchen cabinets are sure to turn heads and give your kitchen an updated look.
– Extra storage: With all that extra space, you’ll be able to store more items than ever before. This is ideal if you have a lot of cookware or small appliances that need a home.
– Can be customized: Because they extend all the way to the ceiling, these cabinets can be customized with different heights and depths to fit your needs perfectly.
Credit: kitchencabinetkings.com
Is It Cheaper to Build Your Own Cabinets Or Buy Them?
Building your own cabinets can be cheaper than buying them, but it depends on a few factors. If you have the tools and materials already, then it will definitely be cheaper to build your own. However, if you need to purchase all of the necessary supplies, then it could end up being more expensive than purchasing cabinets from a store.
It also depends on how complex the design of the cabinets is – if they are very simple, then they will be easier (and therefore cheaper) to build yourself, but if they are more complicated then it might be better to buy them. Ultimately, it comes down to a cost-benefit analysis – weigh up how much time and effort you are willing to put in vs. how much money you want to save.
Can You Make Cabinets Go to Ceiling?
Yes, you can make cabinets go to ceiling. The most important factor to consider when doing this is the height of your ceilings. If you have high ceilings, then you will need to use taller cabinets.
If you have low ceilings, then using cabinets that go to ceiling can make your kitchen feel cramped and cluttered. Another factor to consider is the style of your kitchen. If you have a modern kitchen, then using cabinets that go to ceiling can give it a clean and sleek look.
However, if you have a traditional kitchen, then using shorter cabinets may be a better option.
How Do You Get Kitchen Cabinets to Ceiling?
There are a few ways to get kitchen cabinets to ceiling. One way is to use taller cabinets. Another way is to install crown molding or other trim pieces to close the gap between the top of the cabinets and the ceiling.
Finally, some people choose to leave the space above their kitchen cabinets open for storage.
Should I Build Kitchen Cabinets to Ceiling?
When it comes to kitchen cabinetry, one of the most popular questions is whether or not to build them up to the ceiling. There are pros and cons to both choices, so it really depends on your individual needs and preferences. Here, we’ll take a closer look at each option so you can make an informed decision for your own kitchen.
Building kitchen cabinets up to the ceiling can give your kitchen a taller, more luxurious feel. It can also provide extra storage space for those who need it – especially if you have high ceilings. On the downside, taller cabinets can be harder to reach and clean, so if you’re someone who likes things neat and tidy (or has small children), this might not be the best option for you.
Not building your cabinets all the way up to the ceiling can help keep costs down and make cleaning a bit easier – especially if you choose glass doors for the upper cabinets. Some people feel that stopping short of the ceiling makes a kitchen look shorter and less grand, but again, it’s really a matter of personal preference.
DIY Floor to Ceiling Storage Cabinets with Drawers – Slideshow
Conclusion
Building floor to ceiling kitchen cabinets is a great way to maximize storage in your kitchen. Here are some tips on how to build them:
1. First, you will need to measure the space where you want the cabinets to go.
Make sure to leave enough room for doors and drawer fronts to swing open.
2. Next, cut out plywood panels for the sides, top, and bottom of the cabinet using a circular saw. Then, use a drill to screw the panels together.
3. For the door frames, cut out pieces of lumber that are slightly smaller than the openings of the doors and drawers. Attach these frames using screws and brackets.
4. Finally, add your doors and drawer fronts and install handles or knobs.