How to Add Trim to Bottom of Kitchen Cabinets
There are a few ways to add trim to the bottom of kitchen cabinets. One way is to use pre-made molding that can be found at most home improvement stores. Another way is to make your own molding using a piece of wood and a router.
If you are not familiar with using a router, you can also use a chisel and hammer to create the molding yourself. Whichever method you choose, be sure to measure the space correctly and cut the trim pieces accordingly before attaching them to the bottom of your cabinets.
- Decide on the style of trim you want to add to the bottom of your kitchen cabinets
- Measure the length of the cabinet doors and cut the trim pieces to size
- Apply a bead of wood glue to the back side of the trim piece and press it into place at the bottom of the cabinet door
- Use a nail gun or screwdriver to attach the trim piece to the door, predrilling holes as needed
- Repeat steps 2-4 for each cabinet door in your kitchen
How to Add Trim to Kitchen Cabinets
Adding trim to kitchen cabinets is a great way to update the look of your kitchen without spending a lot of money. There are a few different ways that you can add trim to your cabinets. You can either add it to the outside of the cabinet doors or you can add it to the inside of the cabinet doors.
If you want to add trim to the outside of the cabinet doors, you will need to measure the width of the door and then cut the trim pieces to fit. You can either use a miter saw or a hand saw to cut the trim pieces. Once you have all of your trim pieces cut, you will need to attach them to the door with nails or screws.
If you are adding trim to the inside of cabinet doors, you will need to measure and cut the pieces so that they fit snugly against each other. You can use glue or brad nails to attach the pieces together. Whichever method you choose, adding trim to your kitchen cabinets is an easy and inexpensive way to update their look!
Add Shaker Trim to Cabinet Doors
Adding shaker trim to your cabinet doors is a great way to update the look of your kitchen. This simple project can be completed in a weekend and will make a big impact on the overall look of your space. Here are the supplies you’ll need:
– Cabinet doors
– Shaker trim
– Drill
– 1″ hole saw
– Jigsaw or circular saw
– Nail gun or screwdriver
– Finishing nails or screws
First, remove the existing hardware from your cabinet doors. Then, using a drill and 1″ hole saw, cut holes into the door for the shaker trim.
If you’re using a jigsaw or circular saw, be sure to make straight cuts so that the trim will fit nicely onto the door. Next, nail or screw the shaker trim into place using finishing nails or screws. Be sure to countersink the nails or screws so that they’re flush with the surface of the trim.
Finally, add new hardware to your cabinet doors and enjoy your updated kitchen!
Credit: www.younghouselove.com
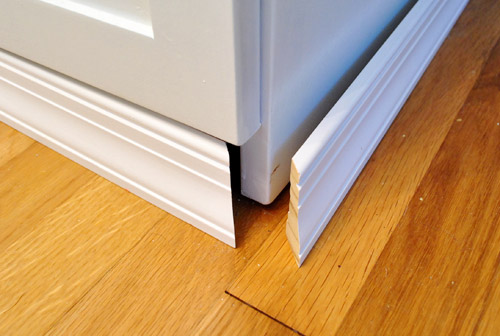
How Do You Install Base Trim on Cabinets?
Installing base trim on cabinets is a relatively easy process that can be completed in a few hours with the right tools and materials. The first step is to measure the dimensions of the cabinet and cut the trim pieces to size using a miter saw. Next, position the trim against the cabinet and mark where you will need to drill pilot holes for attaching the trim.
Once all of the holes are drilled, apply a bead of wood glue to the back of the trim and attach it to the cabinet using finishing nails. Finally, fill any gaps or imperfections with caulk and allow it to dry before painting or staining as desired.
What is the Trim at the Bottom of Cabinets Called?
The trim at the bottom of cabinets is called baseboard. Baseboard is used to protect the lower part of the cabinet from damage and wear. It also helps to give the cabinet a finished look.
What Do You Put on Bottom of Kitchen Cabinets?
There are a few things you can put on the bottom of kitchen cabinets to help with organization and stability. Shelf liner, cabinet mats, or even just some old towels can help protect your cabinets from scratches and wear and tear. If you want to add a little extra stability to tall cabinets, you can also use L-brackets or other hardware to secure them to the wall.
Can I Add Trim to My Kitchen Cabinets?
Sure, you can add trim to your kitchen cabinets – but there are a few things to consider before doing so. First, think about the overall style of your kitchen. If it’s a more traditional space, then adding trim may not be the best idea.
However, if your kitchen has a more modern feel, then some well-placed trim could really help to make it pop. Just be sure to choose a trim that complements the existing cabinets and colors in your kitchen.
Another thing to keep in mind is that adding trim will likely increase the cost of your cabinets.
So, if you’re on a tight budget, you may want to hold off on this project until you have some extra cash saved up. But if you’ve got room in your budget for a little upgrade, then go for it! Adding trim can really take your kitchen cabinets from blah to wow.
Moldings, Finish and Trim with Gary Striegler – Part 14
Conclusion
Adding trim to the bottom of your kitchen cabinets is a great way to add some extra character and style to your space. Here are a few tips on how to do it:
1. Decide what kind of trim you want to use.
There are many different options available, so take some time to browse through different ideas before making a decision.
2. Measure the area where you will be adding the trim. This will ensure that you get the correct size and quantity of trim pieces.
3. Cut the trim pieces to size using a saw or other cutting tool. Be sure to wear protective gear when doing this step.
4. Attach the trim pieces to the bottom of the cabinets using nails, screws, or adhesive tape/glue.
Be sure that the trim is securely attached so that it doesn’t come loose over time.