How to Tighten Kitchen Faucet
The kitchen faucet is one of the most important fixtures in your kitchen. A leaking or dripping faucet can waste a lot of water and money, so it’s important to keep it in good working order. If your kitchen faucet is starting to leak or drip, there are a few things you can do to tighten it up and stop the leaks.
First, check the washer on the end of the faucet. If it’s worn out or damaged, replace it with a new one. Next, check the O-ring inside the handle.
If this is worn out, replace it as well. Finally, if there is any corrosion on the valve seat, clean it off with a wire brush or sandpaper.
Once you’ve checked all of these things, turn on the water and see if the leaks have stopped.
If they haven’t, you may need to replace some of the parts inside the faucet itself.
- Locate the screws that hold the faucet handle in place
- There are usually two screws, one on each side of the handle
- Use a Phillips screwdriver to tighten the screws clockwise until they’re snug against the handle
- Be careful not to over-tighten the screws, which could strip them or damage the finish on your faucet
- Test the handle to make sure it’s tight and doesn’t wiggle or feel loose
How to Tighten Kitchen Faucet Handle
Assuming you have a standard kitchen faucet, the process for tightening the handle is actually quite simple. All you need is an adjustable wrench and a little bit of patience. Here are the steps:
1. Locate the setscrew on the underside of the faucet handle. This is usually hidden by a small cap or plug.
2. Use your adjustable wrench to loosen the setscrew until it is completely removed.
3. With the setscrew removed, you should now be able to see a threaded rod that extends from the handle down into the faucet body.
4. Using your wrench, tighten this rod until it is snug against the inside of the faucet body. Be careful not to over-tighten as this could damage the threads or break off the end of the rod entirely.
5. Once tight, replace the setscrew and lightly tighten with your wrench until snug againstthe rod itself. Again, be careful not to over-tighten as this could strip outthe threads in both parts (the setscrew and/orrod).
How to Tighten a Loose Single Handle Kitchen Faucet Base
If your single handle kitchen faucet is loose, you may be able to tighten it without having to call a plumber. First, try tightening the setscrew that holds the handle in place. If that doesn’t work, you may need to remove the handle and use a wrench to tighten the bonnet nut.
Follow these steps to tighten a loose single handle kitchen faucet:
1. Tighten the Set Screw
The first step is to locate the set screw that holds the handle in place.
This is usually located under a small cap on the back of the handle. Use a Phillips head screwdriver or Allen wrench to turn the set screw clockwise until it’s tight. If this doesn’t solve the problem, move on to step two.
2. Remove The Handle And Tighten The Bonnet Nut
If tightening the set screw didn’t do the trick, you’ll need to remove the handle itself. To do this, look for a small button or tab behind thehandle – pressing or flipping this will releasethe handle from its housing.
Withthe handle removed, use a wrenchto turnthe bonnet nut clockwise untilit’s tightened down snugly againstthe base ofthe faucet (be careful not totighten it too much oryou could strip it). Onceyou’ve gotit tight enough, test out yourfaucet by turningon thewater and givingthe handletwist – ifall goes well, yourloose singlehandle kitchenfaucetcshould now betightened up!
Kitchen Faucet Loose from Countertop
If your kitchen faucet is loose from the countertop, don’t panic! This is a relatively easy problem to fix. Here’s what you need to do:
1. Turn off the water supply to the faucet. This is usually done by turning a knob or lever under the sink.
2. Use a wrench to remove the nuts that secure the faucet to the countertop.
There are usually two of them.
3. Lift the faucet off of the countertop and inspect the mounting holes. If they’re stripped or damaged, you’ll need to use a larger wrench to remove them so that you can replace them with new ones.
4. Place the new mounting hardware in place and screw it in tightly with your wrench. Be sure not to overtighten, as this can strip out the holes again.
5 .
Set the faucet back in place on top of the counter and hand-tighten the securing nuts until they’re snug but not too tight – you don’t want to strip them out again! Then turn on your water supply and test out your newly secured kitchen faucet!
How to Tighten Delta Kitchen Faucet
Most kitchen faucets have a single handle that controls both the hot and cold water. Over time, these handles can become loose, making it difficult to control the water temperature. If your Delta kitchen faucet is loose, you can tighten it yourself with a few simple tools.
To tighten a Delta kitchen faucet, you will need:
-A Phillips head screwdriver
-An adjustable wrench
-A towel or rag (optional)
1. Locate the setscrew on the underside of the handle. This is usually located near the base of the handle.
2. Use your Phillips head screwdriver to loosen the setscrew until it is completely removed.
3. With your adjustable wrench, loosen the retaining nut under the sink counter clockwise until it is completely removed (you may need to use your other hand to hold onto something underneath the sink so that it doesn’t turn when you’re loosening the retaining nut).
4. Removehandle by pulling straight out fromthe base (it may help to twist slightly as you pull).
5Now thatthe handleis removed,you should seea brass insert with acollar nutand washer attachedto a longstem(this is whatyou will be tightening).6.. To make things easier, first removethe washerandcollar nutby unscrewingthemcounter clockwise(again, holdingonto somethingunderneaththe sink soit doesn’t turn).7.. Takeyour adjustablewrench andtighten themain stemby turningitclockwiseuntil its snug(but don’t overdo it!).8..
Puteverythingback togetherin reverse orderby screwing inthe collar nutand washerfirst, followedby reattachingthe handleandsetscrew..9And that’s it! You’vesuccessfullytightenedyourDelta kitchenfaucet!
Kitchen Faucet Tightening Tool
If you’re like most people, your kitchen is one of the busiest rooms in your home. And if you’re like most people, your kitchen sink gets a lot of use. Over time, that can lead to a loose faucet.
But don’t worry, there’s an easy fix. All you need is a kitchen faucet tightening tool.
With this handy tool, you can quickly and easily tighten any loose faucet in your kitchen.
It’s simple to use: just place it over the base of the faucet and turn the knob until it’s tight. That’s it! In no time at all, you’ll have a tight faucet that works like new again.
So if your kitchen sink is starting to drip or leak, don’t despair. Just reach for your kitchen faucet tightening tool and give it a quick twist. You’ll be glad you did!
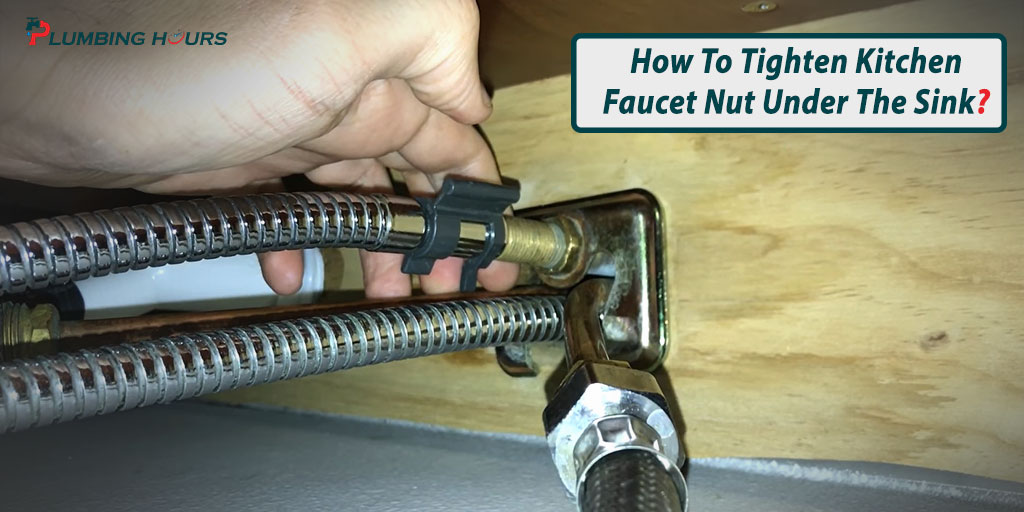
Credit: plumbinghours.com
Is There a Tool to Tighten Kitchen Faucet?
There are a few different ways that you can tighten a kitchen faucet. The most common way is to use a wrench, but you can also use a screwdriver or a pair of pliers. If the faucet is very loose, you may need to use all three of these tools.
First, try tightening the faucet with a wrench. Place the wrench on the base of the faucet and turn it to the right. If this does not work, try using a screwdriver.
Insert the screwdriver into the hole at the base of the faucet and turn it to the right. Finally, if neither of these methods works, try using a pair of pliers. Place one jaw of the pliers on the base of the faucet and turn it to the right with your other hand.
How Do You Tighten a Kitchen Faucet Base?
If your kitchen sink faucet is loose, you may be able to tighten it without having to call a plumber. The first step is to identify the source of the leak. If the faucet is leaking at the base, then you will need to tighten the base.
Here are some steps to help you do this:
1. Turn off the water supply to your kitchen sink. This is usually done by turning a knob under the sink.
2. Place a rag under the base of the faucet to catch any water that may drip out when you remove the faucet.
3. Use an adjustable wrench to loosen and remove the nuts that hold the faucet in place. There are usually two nuts, one on top of the other.
4. Once the nuts are removed, lift up on the faucet and wiggle it until it comes loose from its baseplate (the metal plate that it was mounted on). You may need to use a putty knife or screwdriver to help pry it loose if it’s stuck.
5 .
Clean off any old plumber’s putty or caulk from around the edges of where the faucet meets its baseplate.. This will ensure that there is a good seal when you reattach it later on.
. Apply a bead of fresh plumber’s putty or silicone caulk around edge of where new rubber gasket will sit Then set rubber gasket in place . Make sure there aren’t any gaps between gasket and metal surface .
If there are , caulking or putty won ‘t adhere properly and will cause leaks .
6 . Set faucet back into place over top of rubber gasket and align holes with baseplate . Thread provided mounting hardware (usually screws ) through holes and hand -tighten with Phillips screwdriver until snug , being careful not to overtighten and strip out threads . Finish tightening screws using adjustable wrench .
How Do You Tighten a Faucet under the Sink?
Most faucets have a simple design, which makes them easy to repair. If your faucet is leaking or dripping, the first step is to identify the problem area. Once you know where the leak is coming from, you can then proceed to fixing it.
If the leak is coming from the base of the faucet, chances are that the O-ring needs to be replaced. The O-ring is a small rubber ring that seals the connection between the faucet and the sink. Over time, these rings can become worn out and need to be replaced.
You can purchase O-rings at most hardware stores.
To replace an O-ring, simply remove the old one and replace it with a new one. Make sure that you lubricate the new O-ring with petroleum jelly before installing it.
This will help ensure a tight seal.
If your faucet is leaking from around the handle, then it’s likely that there’s a problem with the packing nut or washer. The packing nut is located under the handle and secures it in place.
The washer is located under the packing nut and provides a seal between the handle and stem assembly.
To fix a leaky packing nut or washer, simply unscrew them with a wrench and replace them with new ones ofthe same size . Be sure to wrap Teflon tape around threads before screwing on new parts – this will help create a tighter seal.
How to fix loose Kitchen Faucet. DIY. #165
Conclusion
Assuming you would like a summary of the blog post titled “How to Tighten a Kitchen Faucet”:
If your kitchen faucet is loose, it can be frustrating and make simple tasks more difficult. Luckily, it is easy to fix a loose faucet yourself.
All you need is a wrench and some patience. With a few quick steps, you can have your kitchen faucet working like new again.