Kitchenaid Mixer How to Remove Beater
To remove the beater from a Kitchenaid mixer, first unscrew the retaining ring at the base of the beater. Then, pull the beater straight up and out of the mixer.
If you’re like me, your Kitchenaid mixer is one of your most prized possessions. Not only does it make baking a breeze, but it also looks great on your countertop. But even the best appliances need a little TLC from time to time, and that includes cleaning the beaters.
Here’s how to remove the beater from your Kitchenaid mixer so you can give it a good scrubbing:
1. First, unplug the mixer and remove the bowl.
2. Then, twist the beater clockwise until it comes loose.
3. Lift the beater out of the socket and voila! It’s ready to clean.
4. When you’re finished washing the beater, simply reattach it by reversing these steps.
And there you have it! A quick and easy way to clean your Kitchenaid mixer’s beater without any fuss.
Can’T Remove Beater from Kitchenaid Mixer
If you can’t remove the beater from your Kitchenaid mixer, there are a few things you can try. First, make sure that the mixer is unplugged and that the speed control is in the off position. Then, try gently wiggling and pulling on the beater while turning it counterclockwise.
If that doesn’t work, you may need to use a pair of pliers to grip the beater and turn it counterclockwise. Once you’ve loosened the beater, you should be able to pull it out by hand. If you’re still having trouble, contact Kitchenaid for assistance.
How to Take Bowl off Kitchenaid Mixer
If you’re like most people, your KitchenAid mixer is one of your most prized possessions. You use it to make everything from cakes and cookies to bread and pasta. But what do you do when it’s time to take the bowl off?
Here are some simple instructions for taking the bowl off your KitchenAid mixer:
1. Unplug the mixer from the outlet.
2. Lift the head of the mixer up so that you can see underneath.
3. There are two metal clamps holding the bowl in place – one on each side. Use your fingers to loosen these clamps until they are no longer tight against the bowl.
4. Carefully lift the bowl off of the mixer, being careful not to spill any contents inside.
Kitchenaid Mixer Stuck in Locked Position
If your KitchenAid stand mixer is stuck in the locked position, don’t worry – it’s a common problem that can be easily fixed! There are two main reasons why your mixer might get stuck: either the bowl isn’t properly positioned, or the beater isn’t correctly inserted. Let’s take a look at how to fix each issue.
If the bowl isn’t properly positioned, you’ll need to make sure that it is aligned with the mixing attachment. To do this, first remove the bowl from the mixer. Then, put the mixing attachment back on and turn it to the locking position.
Next, put the bowl back on and line up the notches on the bowl with the arrows on the mixing attachment. Finally, push down on the release lever to lock everything into place.
If your beater isn’t correctly inserted, there’s a chance that it isn’t seated all the way into The Bowl Lock Positioning Feature.
To fix this, first remove both The Bowl and The Beater. Next locate The Beater Clip which is located on The Back of The Beaters near where they fit into The Mixer Shaft. With one hand holding The Beater in place gently pull outwards onThe Beater Clip until it pops off (it may take a little effort).
How to Remove Whisk from Kenwood Mixer
When it comes to removing the whisk from your Kenwood mixer, there are a few things that you need to keep in mind. First of all, make sure that the power is turned off and the head is in the up position. Next, locate the release button on the side of the mixer and press it in.
The whisk should then come out easily. If it doesn’t, you may need to use a little bit of force to get it out. Finally, rinse off the whisk and put it back in its storage case.
How to Attach Kitchenaid Mixer Attachments
If you’re a fan of baking, then you know that a Kitchenaid mixer is an essential tool. But what do you do when it’s time to attach the attachments? Here’s a quick guide on how to attach Kitchenaid mixer attachments.
First, make sure that the mixer is turned off and unplugged. Then, locate the attachment hub at the front of the mixer. The attachment hub is where all of the attachments connect to the mixer.
To attach an attachment, simply insert it into the attachment hub and twist it clockwise until it’s tight. Make sure that the connection is secure before turning on the mixer.
Once your attachment is securely in place, you can turn on your mixer and start using it!
Just remember to always turn off and unplug your mixer before removing any attachments.
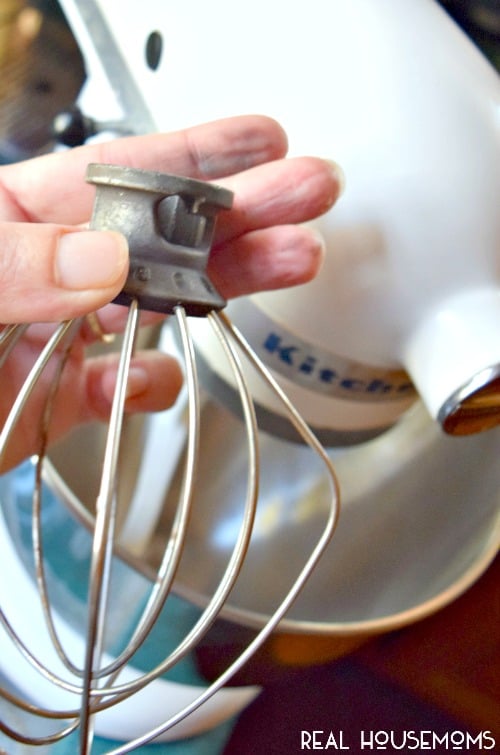
Credit: realhousemoms.com
How Do You Remove a Mixer Beater?
Assuming you are talking about a stand mixer:
To remove the beater from a stand mixer, first make sure that the mixer is unplugged and the beater is not spinning. Then, hold the base of the beater with one hand and twist off the cap at the top with the other hand.
Once the cap is removed, you should be able to pull out the beater.
How Do I Remove the Wisk from My Kitchenaid Mixer?
If your Kitchenaid mixer has a whisk attachment, you can remove it by following these steps:
1. Unplug the mixer from the power outlet.
2. Turn the speed control knob to the “Off” position.
3. Raise the head of the mixer until it is in the upright position.
4. Press down on the release button located on the back of the mixer head, and then pull up on the head to release it from its locking position.
5. Grasp the whisk attachment by its handle, and then twist it counterclockwise to loosen and remove it from the mixing shaft.
How Do You Remove Beaters from a Hand Mixer?
If you’re like most people, your hand mixer came with two beaters: a flat beater and a wire whip. The flat beater is used for most mixing tasks, such as creaming butter and sugar, while the wire whip is used for incorporating air into egg whites and whipped cream.
To remove the beaters from your hand mixer, first make sure that the mixer is unplugged.
Then, hold onto the base of the beater with one hand and twist counterclockwise to loosen. Once loosened, you should be able to pull the beater straight out. Repeat this process with the other beater.
How Do You Put a Beater on a Kitchenaid Mixer?
Assuming you are talking about a KitchenAid stand mixer:
To install the beater, start by inserting the beater shaft into the socket on the mixer’s arm. The beater should fit snugly and not wiggle around.
If it’s too loose, remove the beater and file down the edges of the shaft until it fits tightly.
Next, place the washer over the end of the shaft and screw on the retaining ring. Be sure to screw on the retaining ring finger-tight only — if you tighten it too much, you risk stripping the threads.
Now it’s time to attach the beater itself. For most beaters, there will be a right side and a left side — make sure to orient them correctly before attaching. There are typically two ways to do this: either slip the beater blades onto each side ofthe shaft or slide them onto a central post (if your beater has one).
Once they’re in place, give each blade a quarter turn to lock it into position.
That’s it! You’re now ready to start mixing.
How To Remove A Beater On A Kitchenaid Stand Mixer-Tutorial
Conclusion
If your Kitchenaid mixer beater is stuck, don’t worry! With a few simple steps, you can easily remove it. First, make sure that the mixer is unplugged and the bowl is empty.
Then, holding the beater with one hand, use your other hand to twist the bowl clockwise until it comes loose. Finally, lift the bowl off of the mixer and voila! The beater should come right out.