How to Replace Floor under Kitchen Cabinets
Replacing the floor under kitchen cabinets is a relatively easy process. First, remove the cabinet doors and hardware. Next, use a pry bar to carefully remove the trim around the edges of the floor.
Then, remove the old flooring material and install new flooring in its place. Finally, reattach the cabinet doors and hardware.
- Remove the doors from the cabinets and set them aside
- Unscrew and remove the cabinet baseboard trim
- Pull up the old flooring material, starting from the farthest corner of the room and working your way towards the exit
- Clean up any debris left behind from the old flooring material
- Install a new vapor barrier over the subfloor if necessary
- Lay down your new flooring material, starting at the farthest corner of the room and working your way towards the exit again
- 7Install baseboard trim to finish off the project
Replacing Kitchen Floor Without Removing Cabinets
If you’re looking to replace your kitchen floor without removing your cabinets, there are a few things you’ll need to keep in mind. First, you’ll need to make sure that the new flooring is compatible with the existing cabinets. This means considering both the material and the color of the new flooring.
You’ll also want to make sure that the new flooring can be properly installed without damaging the cabinets.
Once you’ve selected the right type of flooring, it’s time to install it. If you’re installing a hardwood or laminate floor, you’ll need to use transition strips to avoid damage to your cabinets.
You may also need to use special adhesive or nails to secure the new flooring in place. If you’re installing tile, linoleum, or vinyl sheeting, you can usually lay it directly overtop of your old kitchen floor. Just be sure to clean and prep the surface first so that the new material will adhere properly.
With a little bit of careful planning and execution, replacing your kitchen floor doesn’t have to mean removing your cabinets!
Replace Kitchen Cabinet Bottom Panel
If you’re kitchen is looking a little dated, one easy way to give it a quick facelift is to replace the bottom panel on your cabinets. This project is relatively simple and can be completed in a few hours. Here’s what you need to do:
1. Remove the existing panel: Use a screwdriver or drill to remove the screws that are holding the panel in place. Gently pull the panel away from the cabinet frame being careful not to damage the wood.
2. Cut new panel to size: Measure the opening of your cabinet and then cut your new panel to size using a saw.
If you’re not confident in your ability to get an exact measurement, it’s better to err on the side of caution and cut the panel slightly smaller than needed. You can always trim away any excess later on.
3. Attach new panel: Place the new panel into position and use screws or nails to secure it in place.
Be sure to countersink any screws so that they’re flush with the surface of the wood. Once all fasteners are in place, sand away any rough edges and paint or stain as desired.
And that’s it!
In just a few simple steps you’ve given your kitchen an updated look without spending a fortune on new cabinets or extensive renovations.
Cost to Replace Sink Cabinet Floor
If your sink cabinet is starting to show its age, you may be considering replacing it. But how much will this project cost? Here’s a look at the factors that will affect the cost of replacing your sink cabinet floor.
The first thing to consider is the size of your sink cabinet. A larger cabinet will obviously require more material and labor to replace than a smaller one. The type of material you choose for your new flooring will also impact the cost.
Laminate floors are generally less expensive than solid hardwood or tile, but they’re also not as durable. If you’re looking for a high-end look, stone or tile might be the way to go. However, these materials can be quite costly.
Finally, don’t forget to factor in the cost of installation when budgeting for this project. Unless you’re experienced in installing floors, it’s likely that you’ll need to hire a professional to do the job. This can add several hundred dollars to the total cost of your project.
With all these factors in mind, replacing your sink cabinet floor can range from being a relatively inexpensive update to costing several thousand dollars. It all depends on your specific situation and what type of finish you’re looking for.
Kitchen Floor Replacement Cost
When it comes to kitchen floor replacement cost, there are a few things to consider. First, the type of flooring you select will impact the overall cost. For example, tile or hardwood floors will be more expensive than laminate or vinyl.
Second, the size of your kitchen will also play a role in the cost of replacement. A larger kitchen will obviously require more materials and labor, which will drive up the price. Finally, any special features or finishes you select (like inlay work or custom edging) will also add to the final bill.
With all that said, here are some average costs for replacing a kitchen floor:
Laminate: $500 – $1,000
Vinyl: $600 – $1,200
Tile: $800 – $2,000+
How to Replace Kitchen Floor
If your kitchen floor is in need of a facelift, don’t despair! Replacing a kitchen floor is not as difficult as you might think. With a little time and effort, you can have a brand new floor that you’ll be proud of.
Here’s what you’ll need to do to replace your kitchen floor:
1. Remove the old flooring. This is the most time-consuming part of the project, but it’s also the most important.
You’ll need to remove all of the old flooring, including any adhesive that may be left behind. Be sure to wear gloves and protective eyewear while doing this to avoid getting hurt.
2. Clean the subfloor.
Once the old flooring is removed, it’s time to clean the subfloor beneath it. Be sure to sweep and vacuum thoroughly before moving on to the next step.
3. Install the new flooring.
This is where things get fun! Now you get to choose what type of new flooring you want to install in your kitchen. There are many different options available these days, so take your time and pick something that you’ll love for years to come.
Once you’ve made your selection, follow the manufacturer’s instructions for installation carefully.
4.. Enjoy your new kitchen floor!
That’s it – you’re done! Sit back and enjoy your handiwork; you’ve just given your kitchen a whole new look without spending a fortune!
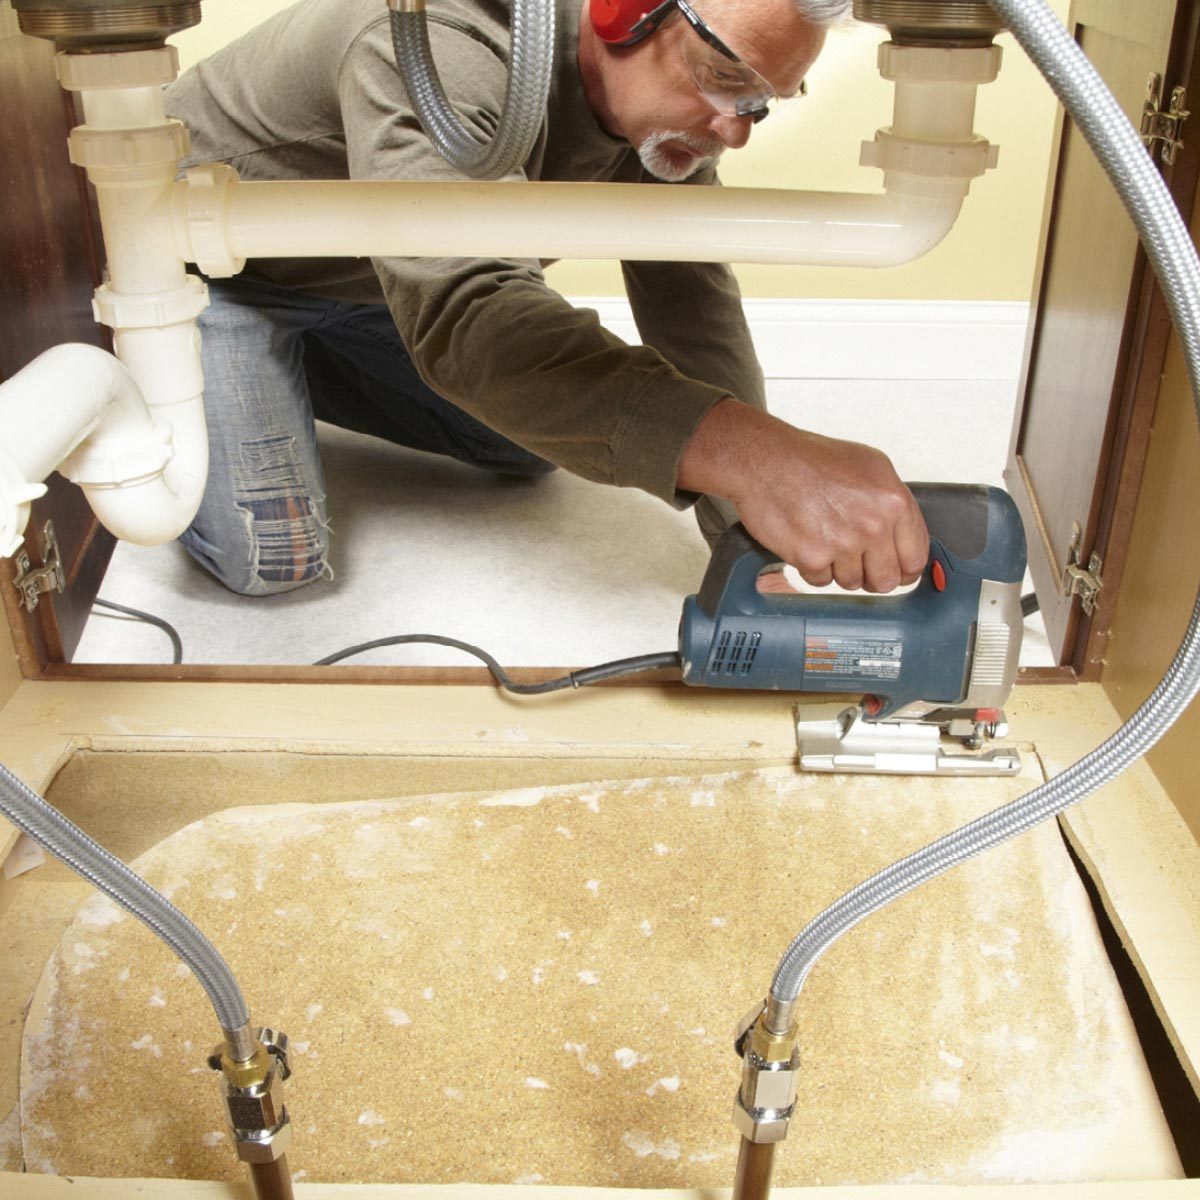
Credit: www.familyhandyman.com
Can You Replace a Kitchen Floor Without Removing Cabinets?
It is possible to replace a kitchen floor without removing cabinets. This can be done by either jacking up the cabinets or by cutting around them. If the cabinets are in good condition and you do not want to remove them, jacking up the cabinets is the best option.
This will require some extra work, but it will save you from having to remove and then reinstall your cabinets. To jack up the cabinets, first remove all of the doors and drawers. Next, use a hydraulic jack to lift each cabinet off of its base.
Be sure to support the weight of each cabinet with boards or other sturdy objects so that they do not fall over while you are working on them. Once all of the cabinets are lifted, you can begin installing your new flooring.
If you do not want to go through the hassle of jacking up your cabinets, another option is to simply cut around them.
This can be done with a circular saw or a reciprocating saw. First, mark out a line around each cabinet using a pencil or chalk line. Then, cut along these lines with your chosen tool.
Be sure to wear safety goggles and a dust mask while doing this so that you do not inhale any debris.
How Do You Remove Flooring from under Cabinets?
If you’re planning to remove flooring from under your kitchen cabinets, there are a few things you’ll need to do first. First, use a putty knife to loosen the caulk around the perimeter of the cabinet base. Next, unscrew any screws or nails that are holding the cabinets in place.
Finally, use a pry bar to gently lift the cabinets away from the floor. With a little patience and effort, you should be able to remove your flooring without damaging your cabinets!
Why Don’T You Put Flooring under Kitchen Cabinets?
If you’re wondering why don’t you put flooring under kitchen cabinets, the answer is simple – it’s not necessary! Kitchen cabinets are designed to sit on top of a finished floor, so there’s no need to install additional flooring underneath. Plus, installing flooring under kitchen cabinets can actually make your kitchen look smaller and more cluttered.
So if you’re looking for an easy way to update your kitchen without breaking the bank, skip the extra flooring and stick with what you’ve got!
How Do You Replace Base Cabinet Flooring?
Assuming you would like tips on how to replace base cabinet flooring:
1. Begin by removing all of the doors and drawers from the cabinets. This will make the process much easier and less time-consuming.
2. Use a putty knife to remove any old caulk or sealant that may be present around the perimeter of the base cabinets. This will help ensure a tight, clean fit for your new flooring.
3. Next, use a utility knife or jigsaw to cut away any old vinyl flooring that may be present on top of the subflooring.
Be sure to take care not to damage the subflooring as you do this.
4. Once all of the old flooring has been removed, sweep and vacuum the area thoroughly to remove any dust or debris that could potentially interfere with the installation of your new flooring.
5. If you are installing sheet vinyl flooring, begin by measuring out and cutting your first piece to size using a sharp utility knife or scissors.
Peel back a corner of the backing paper and adhere the vinyl down in one corner of the room, taking care to smooth it out as you go so there are no bubbles or wrinkles present. Continue working your way across the room in this manner until all of the base cabinets have been covered with vinyl flooring. Be sure to trim off any excess material around edges and corners with a utility knife before moving on to step 6.
6 .If you are installing tile flooring, begin by spreading adhesive onto the subfloor using a notched trowel according being careful not to apply too much pressure so as not to damage delicate tiles .Lay your first row of tiles along one wall making sure each tile is properly spaced using plastic spacers .
Use a level periodically throughout this process making adjustments as necessary until everything is perfectly level .
How to replace rotted sink base cabinet floor bottom. Easy! Home Mender.
Conclusion
If your kitchen cabinets are starting to sag or there are gaps between the cabinet and the floor, it might be time to replace the floor under the cabinets. This is a relatively easy project that you can do yourself, and it will make your kitchen look much neater and more updated. Here’s how to replace the floor under kitchen cabinets:
1. First, remove everything from the cabinets, including all of the shelves. You may need to use a screwdriver to remove some of the screws holding the shelves in place.
2. Next, use a chisel to pry up any old flooring that may be glued down.
If there is no old flooring, you can skip this step.
3. Measure the area where you will be installing new flooring. Cut your new flooring to size, making sure to leave about an inch of extra material on each side so that you can trim it later if needed.
4 .Install your new flooring by nailing or gluing it into place. Start at one end of the cabinet and work your way around until all of the new flooring is in place.
Trim off any excess material with a utility knife before moving on to Step 5 .