
How to Tighten Kitchen Faucet Nut under Sink
If your kitchen faucet has a loose nut, you can tighten it using a wrench. First, locate the nut under the sink. It is typically located near the base of the faucet.
Then, use a wrench to turn the nut clockwise until it is tight. Be careful not to over-tighten the nut, as this could damage the faucet.
- Locate the faucet nut under the sink
- This is typically a large, metal nut that secures the faucet to the sink
- Place a rag over the drain to prevent small parts from falling into it
- Use an adjustable wrench to loosen the faucet nut by turning it counterclockwise
- If the nut is particularly tight, you may need to use a pair of pliers as well
- Remove the old washer and replace it with a new one if necessary
- Make sure that the new washer is seated properly before continuing
- Tighten the faucet nut by turning it clockwise with an adjustable wrench until snug
- Do not overtighten, as this could damage both the nut and the sink itself
How to Tighten Moen Kitchen Faucet Nut under Sink
If your Moen kitchen faucet is leaking, it may be because the nut under the sink is loose. Here’s how to tighten it:
1. First, shut off the water supply to the faucet.
This is usually done by turning a knob or lever under the sink.
2. Next, place a towel over the drain to catch any drips and remove any objects that might get in your way while you’re working.
3. Locate the nut under the sink that needs to be tightened.
It will be on either side of the faucet base, and you may need a flashlight to see it clearly. Use an adjustable wrench to tighten the nut until it’s snug against the base of the faucet (don’t overtighten).
4. Finally, turn on the water supply and test your faucet to make sure it’s no longer leaking.
Basin Wrench
If you’re a homeowner, chances are you’ve had to deal with a leaky faucet or two. And if you’re lucky, you were able to fix it without too much trouble. But what do you do when the leak is coming from a place you can’t see – like underneath the sink?
That’s where a basin wrench comes in handy.
A basin wrench is a tool that is specifically designed to reach those hard-to-get-at places. It has a long, slender shaft with a jaws at one end that open and close like pliers.
This allows you to get a good grip on whatever it is you’re trying to turn – whether it’s a nut or bolt.
Basin wrenches come in both manual and automatic versions. The manual version is cheaper and easier to use, but the automatic version will save you time and effort in the long run.
Whichever type you choose, make sure that it’s adjustable so that you can get the perfect fit for your needs.
Using a basin wrench is relatively simple. First, adjust the jaws so that they are slightly smaller than the nut or bolt that you’re trying to remove.
This will help ensure that you don’t slip and damage the finish on your fixtures. Next, position the wrench so that the jaws are lined up with the nut or bolt head. Finally, apply pressure to the handles until the jaws grip tight, then twist counterclockwise until the fastener loosens and can be removed by hand.
While basin wrenches are not required for every plumbing job, they can be invaluable when dealing with leaks in difficult-to-reach places. So next time you’re faced with a pesky leak, reach for your trusty basin wrench and rest assured knowing that there’s no repair job too tough for this versatile little tool!
How to Tighten Kitchen Faucet Plastic Nut under Sink
If your kitchen faucet has a plastic nut under the sink, you may be wondering how to tighten it. The good news is that it’s actually quite easy to do! Here’s what you need to know:
First, make sure that the water supply is turned off before you begin working on the faucet. Next, take a look at the plastic nut and determine which way it needs to be turned in order to tighten it. If you’re not sure, consult a diagram of your particular model of faucet (usually found in the owner’s manual).
Once you know which way to turn the nut, use an adjustable wrench to grip it firmly. Then, turn the wrench in the direction that will tighten the nut. Be careful not to overtighten it – just snug it up until it feels tight.
That’s all there is to tightening a kitchen faucet with a plastic nut! With this simple task out of the way, your faucet should be functioning properly once again.
How to Tighten Lock Nut under Sink
If you have a lock nut under your sink that needs tightening, there are a few things you can do. First, try using a wrench to tighten the lock nut. If the wrench doesn’t work, you can try using a pair of pliers.
If neither of these methods work, you may need to replace the lock nut.
Tool to Tighten Faucet under Sink
If you have a loose faucet under your sink, it can be very annoying. A loose faucet can cause the water to drip and make noise. It can also be difficult to turn on and off.
Luckily, there is an easy tool that you can use to tighten a loose faucet under your sink.
This tool is called a basin wrench. A basin wrench is a long, slender tool that has a ratcheting mechanism.
This makes it easy to reach tight spaces and loosen or tighten nuts and bolts. Basin wrenches are available at most hardware stores.
To use a basin wrench, first make sure that the jaws of the wrench are open wide enough to fit around the nut or bolt that you need to loosen or tighten.
Then, position the wrench so that the jaws are touching the nut or bolt. Finally, ratchet the wrench in the direction that you need to go (loosen or tighten).
If your faucet is very loose, you may need to use two basin wrenches at the same time (one on each side of the nut or bolt).
This will give you more leverage and make it easier to loosen or tighten the nut or bolt.
Credit: www.protoolreviews.com
How Do You Tighten a Nut under a Faucet?
If you have a leaky faucet, it might be because the nut underneath is loose. To tighten the nut, you’ll need to access it from below. First, turn off the water supply to your sink.
Then, place a bucket or bowl under the sink to catch any water that drips out. Next, use a wrench to loosen the bolt that secures the P-trap in place. Once the P-trap is loose, you should be able to see the nut that needs to be tightened.
Use a wrench to tighten the nut until it’s snug. Finally, reattach the P-trap and turn on the water supply.
How Do You Tighten a Wobbly Kitchen Faucet?
When a kitchen faucet becomes wobbly, it’s usually because the base is loose. To tighten a wobbly kitchen faucet, start by turning off the water at the shutoff valves beneath the sink. Then, remove the decorative cap on the handles and use a hex wrench to loosen the setscrew that secures each handle to its base.
Next, use pliers to grip the bottom of the faucet and twist it clockwise until it’s tight against the countertop. Finally, replace the handles and turn on the water.
What Tool is Needed to Tighten Faucet under Sink?
If your faucet is leaking from the base, it’s likely that the retaining nut is loose. To tighten a faucet under sink, you’ll need a wrench to turn the retaining nut clockwise until it’s snug. Be careful not to overtighten, as this could damage the threads or break the sealant tape.
If your faucet has a separate handle for hot and cold water, you may need to use two wrenches (one on each handle) to loosen or tighten the retaining nuts.
How Do You Tighten a Moen Kitchen Faucet under the Sink?
If your Moen kitchen faucet is leaking, you may be able to fix it yourself without having to call a plumber. The first step is to identify the source of the leak. If the leak is coming from around the base of the faucet, it’s likely that the O-ring seals need to be replaced.
If the leak is coming from the handle or spout, it’s likely that a washer needs to be replaced. Once you’ve identified the source of the leak, you can follow these steps to tighten your Moen kitchen faucet under the sink:
1. Shut off water supply valves beneath sink.
2. Place a towel or bucket beneath faucet assembly to catch any water that may drip while you’re working.
3. Unscrew and remove handle cap with a Phillips screwdriver. Be careful not to lose track of small parts like screws and washers.
4. Use an Allen wrench to loosen setscrew in handle base and pull off handle. Again, take care not to lose any small parts during this process.
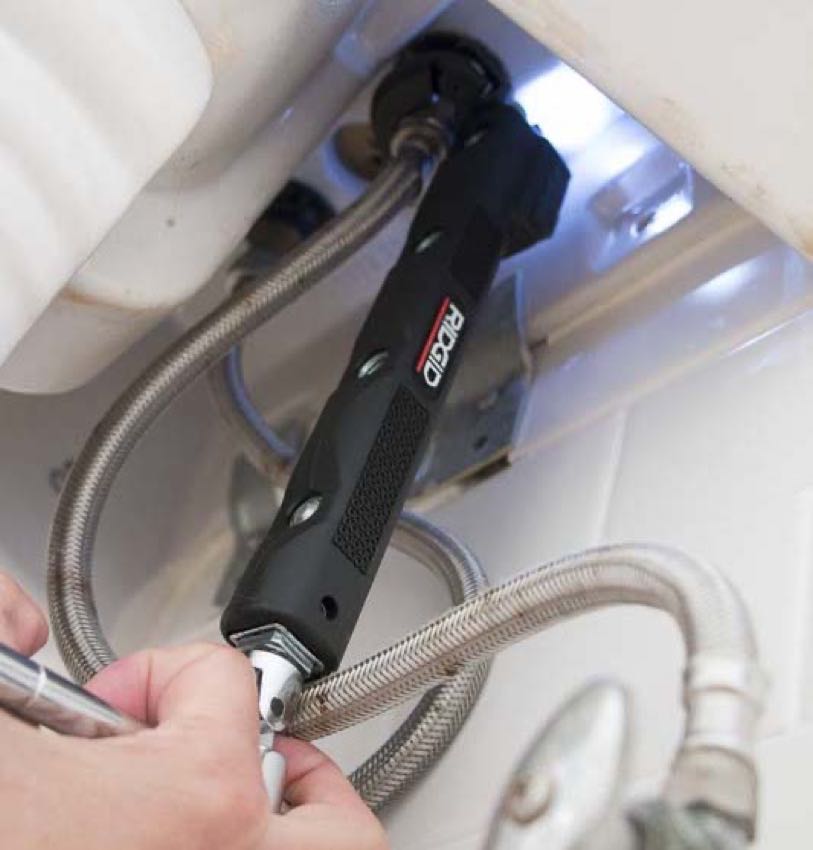
Tightening a loose kitchen faucet with the Rigid Sink Wrench
Conclusion
This blog post was very helpful in teaching how to tighten a kitchen faucet nut under the sink. The author was clear and concise in their instructions, and provided helpful pictures to illustrate the process. Overall, this was a great resource for anyone who needs to fix a loose faucet.


